As a college #girlboss, we’re on the move at all times- running errands, dashing to class, stopping by our best friend’s party, attending speakers on campus and studying at local coffee shops. With all this commotion, it’s easy to forget the little tasks with deadlines that sneak up on us throughout the week. We’re almost positive we’re not the only girls with desks cluttered with post-it notes, calendars, lists, planners and half-filled, sporadic idea-journals.
If this sounds like you, it’s time to consider finding an organization system that will fine-tune your busy, collegiate lifestyle, leaving you with more room to spend time making memories instead of mental notes about assignments and due dates.
Enter: The Bullet Journal.
The Bullet Journal was designed by Ryder Carroll, an Art Director and Interaction Designer living in Brooklyn, NY, who has made his innovative idea available for anyone to use over at his website. Most simply put, it’s a “the analog system for the digital age.”
The journal is a customizable, DIY notebook that can serve as the ultimate holder of your to-do lists, sketchbook, planner, diary and more. Consider it a fast-track system to efficient productivity and complete organization. It will help you “do more with less” (PSA: calling all minimalists).

Normal journaling, note-taking, list-making, and planner-filling is a burden. The more time and effort we know it takes to complete the task at hard, the more of a chore it becomes. We’re less likely to keep up with a journal, planner, calendar, and to-do list, so why not combine them all in one? Sure, there are productivity apps and mobile phone event reminders, but there’s nothing quite as satisfying as taking pen to paper and crossing off a list to-do item indicating completion.
Step 1: Purchase
Aim to find a small, compact journal, easy enough to carry around in your purse, backpack or suitcase. This will soon become your lifeline, so durability should be a quality at the top of your criteria. Whether you choose a wide-ruled, college-ruled, grid or dot journal, make sure the pages are thick enough to prevent your pen from bleeding through and easily satisfies your note-taking taste.
Step 2: Create a Key
Since the journal can be customized to fit your needs, Ryder’s website contains complex “extensions” and “modules” to the basic Bullet Journal formula in the site’s library, but for beginners a simple approach might be best at first.
You’ll need to create a key for your journal. A key is basically a well-structured shorthand legend to help understand your tasks in the most simplified way possible. This legend is how you will begin your journal. While daily to-do lists are the most common use for Bullet Journals, the beauty of the system is found in its flexibility to do so much more. From monthly overviews to food diaries to ongoing projects, the bullets can be modified to fit all of your needs.
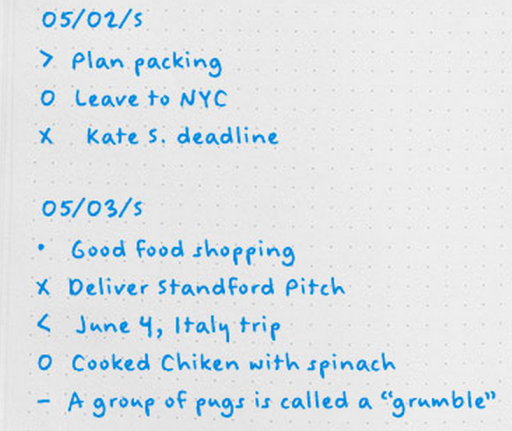
Each bullet represents a different kind of note, so on one of the first few pages, create a system similar to the one below to help denote how you will monitor tasks, events, and notes:
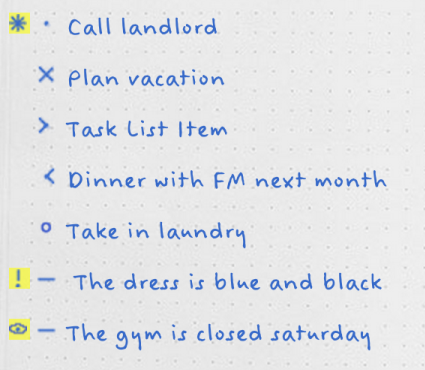
- Tasks: A bullet (•) denotes an actionable item or task you need to complete. The bullet can modify the symbol by putting an ‘X’ through it, to show it’s been completed, arrowing left () to carry it over to the next day’s list.
- Events: An open circle (O) denotes an event to remember. Events are date-related entries that can either be scheduled (ex. “Mom’s birthday”) or logged after they occur (ex. “accepted campus job”), and should be written in short, objective words. (Don’t worry, you can always switch into diary mode and write all about how exciting it was to finally land that campus job in the coffee shop your crush studies at on the next page!)
- Notes: A dash (—) is any important note to remember or jot down from the day, your thoughts, or science class.

These three types of notations are the essential structure to your Bullet Journal. If you’re like us Lala ladies and need to prioritize or draw attention to particular tasks, have no fear- this is where ‘signifiers’ come into play.
- Signifiers: These symbols are marked in the margin, which can go to the left of a bullet, circle, or dash to draw extra attention to it. They can be whatever you feel draws most attention for you, but we recommend starting with a star (*) to indicate priority and an exclamation mark (!) to represent significant or important ideas.
Step 3: Create an Index
One of the most beautiful parts of a bullet journal is the ability to look back in time at your week, month or even year. Did you forget about the time you ran to grab donuts with the girls instead of study for your history midterm? Don’t worry, that’s in there (along with a ‘>’ next to ‘study for history’ because it didn’t quite get done that night…).
Page numbers are also largely important to the structure of your Bullet Journal and index. By numbering each page, you can create an Index that will allow you to travel back to a specific day or month to see just how you conquered it. Also, ensure you include a header, or topic, at the top of each page. This can be anything from “October 8th, 2015” to “Study Abroad Trip Plans.” In the end, you will have a more visualized idea of where different types of content fall within your journal- from sketches to class notes, and future ideas to packing lists.

Step 4: Migrate Incomplete Tasks
Within your first week of journaling, take a glance back at your previous entries for the week. Look through your tasks to see if any was missed or unresolved while simultaneously putting an ‘X’ through those you successfully completed. Take a minute to decide whether your tasks are still relevant.
If a task is no longer something that needs to be completed or never happened, like “study for media pop-quiz,” strike out the entire line and bullet (oops). If the task is still important and needs to get done, turn the “•” into “>” to signify that you’ve ‘migrated’ that bulleted task, then add it to the Task Page of your new Weekly Log.

Migrating content is the “cornerstone of Bullet Journaling.” This allows you to control your anxiety over missed assignments, forgotten errands, fleeting thoughts and birthday gift reminders.
And that’s a wrap! In case this wasn’t thorough enough of an explanation, feel free to checkout Ryder’s website with all of the in’s and out’s of Bullet Journaling, as well as this awesome video for how to get started. Let us know how you like your new style of organization in the comments below!